|
Image quality is extremely important. Most
shoppers use the search engine or the showcase to find a class of items,
but use the images that they see to decide what they are going to look at.
So the clarity and quality of your images are very important.
There are two ways to get images for your store -- one is to take pictures
with a digital camera and the other is to take picture, scan them and then
use the scanned images. Click here for the tutorial
on taking good pictures. For tips on how to improve the quality
of any image through editing, read the tutorial
on image editing. This tutorial describes some ways to make
scanned images look better.
Note that many scanners can be used to get very good
images of small 3-dimensional objects as well as flat ones. To do
this, simply place the object you want to get an image of on the scanner
bed. You'll need to eliminate light leakage around the object and
the bed of the scanner and black plastic trash bags are very opaque and
work very well for this purpose, even if it looks rather tacky when you're
doing it. So place the trash bag over the entire scanner bed (you're
eliminating all extra light) and then scan the object. Proceed as
below or as in the tutorial on image editing.
1. Scanning the image
The first point to note is that you want to get as much information
as possible into your picture. You can always REMOVE
information, but you can't add it (unless, of course, you're a very good
digital painter, in which case, you may want to proceed to the tutorial on
image editing. By getting information, we mean to scan the image on
the highest possible resolution that your equipment will allow.
 If
your scanner can get images at 600 dpi or even higher, use that setting.
Note that some digital processing programs cannot handle images above
certain levels of resolution. (its reported that Paint Shop Pro can
only handle images at 385 dpi, for instance). If this is the case,
it may be a good idea to make one of your first investments in an editing
program with better capabilities. If
your scanner can get images at 600 dpi or even higher, use that setting.
Note that some digital processing programs cannot handle images above
certain levels of resolution. (its reported that Paint Shop Pro can
only handle images at 385 dpi, for instance). If this is the case,
it may be a good idea to make one of your first investments in an editing
program with better capabilities.
If you'd like to follow along on the rest of this
tutorial doing hands-on, click here to download an image
that was scanned at 600 dpi. The raw image is stored in .tif
format, the raw image is 2671 x 3671 pixels and it is approximately 28 Mb.
Don't bother downloading this if you don't have DSL or cable!
2. Cropping the Image
Its very unusual that you'll be able to use an image exactly as it was
taken. Your picture quality can degrade very quickly when you change the
size of your images; although some image editing products do a much better
job of this than others. So before you start sizing, you want
to get the image to be as close to its final format as possible.
 When you you change the size of an image, you are going
to get the best results if you are changing the image to exactly one
quarter or one-sixteenth of its original size. So if you have an image
that is (say) 400 x 400, if you change its size to 200 x 200 or 100 x 100
the image will look much better than if you changed it to (say) 350 x 350.
The sizes that will work best are those you can get to by dividing by 2.
So when you crop the image (cut it out so that you've got
your final image), the rest of the editing is going to work better
if you crop your image to an even number of pixels in each dimension.
Furthermore, if you are going to be a major resizing effort, make sure the
number in each direction is divisible by 4. Note that this is NOT resizing,
this is cropping (or cutting or using the canvas size operation,
depending on your image editing product). After cropping, this image
is 644 x 828 pixels at 600 dpi. When you you change the size of an image, you are going
to get the best results if you are changing the image to exactly one
quarter or one-sixteenth of its original size. So if you have an image
that is (say) 400 x 400, if you change its size to 200 x 200 or 100 x 100
the image will look much better than if you changed it to (say) 350 x 350.
The sizes that will work best are those you can get to by dividing by 2.
So when you crop the image (cut it out so that you've got
your final image), the rest of the editing is going to work better
if you crop your image to an even number of pixels in each dimension.
Furthermore, if you are going to be a major resizing effort, make sure the
number in each direction is divisible by 4. Note that this is NOT resizing,
this is cropping (or cutting or using the canvas size operation,
depending on your image editing product). After cropping, this image
is 644 x 828 pixels at 600 dpi.
3. Sizing
Your digital image is composed of pixels. When an image is made
smaller, your imaging product has to decide what to do with each pixel in
the picture. If you specify an even division by 2, this is a very simple
process -- the program just has to select every other pixel. This process
goes by the jaw-breaking name of 'bilinear decimation', but it just really
means 'picking every other line'. If you do this, you will find that the
image does not degrade nearly as much during sizing.
When you specify a size that cannot be arrived at by
simple decimation, the problem becomes much more difficult. If, for
instance, you want your 400x400 image to become 300x300, the imaging
program cannot simply discard (say) every fourth pixel. The image would be
HUGELY distorted and you'd think about asking for a refund from the
software company that developed such a piece of junk. So in this case your
imaging program has to mathematically determine what the approximate color
value is for each pixel that is going to have to be created in the new
image and do so. Some imaging programs are better at this than others --
Adobe Photoshop, for instance, does a MUCH better job at this than the
Microsoft Paint program. And Photoshop is priced so that Adobe
can cover their massive investment in software design. But even on
high-end graphics products, if you force a reduction from an odd
dimension, your finished image quality will probably be worse than if you
had specified a size that was an even division.
 So the next step is to convert the image to its expected
finished size of 322 x 414 pixels, still at 600 dpi. And you're probably
thinking 'worse and worse', no one is going to look at an image this tiny.
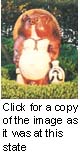
And you'd be right if the image were really this small!. Click on
the thumbnail to get a copy of the image as it really was at this stage in
the process. So the next step is to convert the image to its expected
finished size of 322 x 414 pixels, still at 600 dpi. And you're probably
thinking 'worse and worse', no one is going to look at an image this tiny.
And you'd be right if the image were really this small!. Click on
the thumbnail to get a copy of the image as it really was at this stage in
the process.
| 4. Convert to Viewable Format |
5. Sharpen |
| Next, you need to convert this to
displayable format (computer monitors display at 72 lines per inch).
Adjust the number of lines per inch to 72, keeping the size at
322 x 414 pixels. The image will look as below:
|
This step is not always necessary, but if
your image is a little fuzzy, using a sharpen operation may
improve the quality. This operation goes by different titles
in the various products, so you may need to look at the
documentation for your graphics editor |
 |
 |
If you're having a hard time seeing the difference
between these two images, look carefully at the left hand of the image, at
the leaves in the hedge and at the edges of the tanuki.
6. Is your computer struggling with this
process? Finally, a small note about image editing and your computer
system. Images tend to contain a LOT of data. And many editors
support an 'undo' operation, which means that they store past copies or
paths to past copies of your image. So in addition to the image data you
see, your editing product is also keeping track of the prior images in
your session. If you find that your system is doing a lot of writing
to disk when you are editing images (this is called 'paging'), you may get
a very significant improvement in performance if you add more real memory
to your computer. You can also reduce the amount of data your image
editor is managing by periodically saving and re-opening your image.
Note that doing this will lose the paths to prior steps -- the undo won't
work. But if you are sure you don't need to undo what you have, your
computer won't have to page as much.
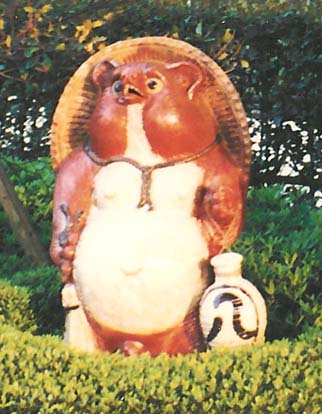
For the curious, the figure above is the statue of a
tanuki that's located outside the Fujitsu headquarters in Tatabayashi,
Japan. The real tanuki is a Japanese raccoon and 'tanuki' is a
proper term for the species. Like the fox in English-language
mythology, the tanuki appears in Japanese folklore as a trickster.
He is also reputed to be a good-time guy who is a real 'party animal'.
He is often depicted as above, holding his checkbook in his right
hand, his sake bottle in his left hand and ready for a fun time.
This image was used solely because I had the picture around; the object is
not, so far as I know, for sale. |

